Monday, August 31, 2009

Nigella's Brownies

This weekend I became a domestic goddess when I bought a cookbook by British baker Nigella Lawson and made these brownies for my party, to smashing success:

Brownies

1 2/3 c. soft unsalted butter (I used salted butter though, because I like things to be saltier than not)
13 ounces bittersweet chocolate (I used 8 oz. generic baking chocolate, a 3.5 oz. Ghirardelli 60% cacao bar, and a handful of milk chocolate chips)
6 large eggs
1 tbsp. vanilla extract
1 2/3 c. sugar
1 1/2 c. all-purpose flour
1 tsp. salt
1 1/3 c. chopped walnuts

Melt the butter and chocolate together in a large heavy-based pan. In another bowl beat the eggs with the vanilla and sugar. When the chocolate mixture has melted, let it cool a little and add the eggs and sugar, then sift in the flour and salt, and add the nuts last. Mix well, then scrape the batter into a 13 x 9 x 2 pan lined with foil (I put mine into individual cupcake papers in a muffin tin). Bake at 350 degrees for 25 minutes (20 for the muffin tin method) until the top is dry and pale but the inside is still gooey.

Nigella says you can try it with dried cherries instead of nuts, or with nothing at all. And normally I don't like nuts in my brownies, but these were divine. It's also heavenly to top them with chopped strawberries and some whipped cream or vanilla ice cream. Really, the possibilities are endless, and the recipe is so easy I might not even bother with brownie mixes ever again.

Sunday, August 30, 2009

White Lasagna

For some reason the idea of a white lasagna came to my mind one day, and I decided to make it. I'm not sure if it's my blood type diet which says that I'm supposed to avoid tomatoes or my recent desires to try making creative dinners that sparked my interest in this lasagna, but I think it turned out pretty good. I've never even eaten a white lasagna before let alone made one, but I definitely enjoyed both making and eating this one.


Disclaimer: When cooking, I don't really follow any recipes, so the measurements used here are all approximated.

Ingredients:
  • 6 tablespoons butter
  • 6 tablespoons flour
  • 3 cups milk
  • 1 cup water
  • seasoned salt (or just plain salt is fine)
  • 1 cup chopped green onions
  • 1 cup chopped spinach
  • 1 egg
  • 15 oz ricotta cheese
  • 3/4 cup Parmesan cheese
  • 1 tbsp basil
  • 2 cloves minced garlic
  • 1 zucchini
  • 3/4 pound mozzarella cheese
  • 1/4 pound mixed Italian cheese
  • 1/4 cup parmesan cheese
  • 1 package lasagna noodles (9 or 12 noodles)

Directions:

  1. Make a roux with the butter and flour. Here's how: Melt the butter over a medium heat. Add the flour. Stir over a medium heat for 5-10 minutes.
  2. Slowly add the milk and water. Stir constantly with whisk until thick (this may take awhile).
    • Note: I never precook my lasagna noodles, so I add water to the sauce which will cook the noodles while the lasagna cooks in the oven.
  3. Add salt to taste. Add green onions and spinach to white sauce.
  4. In a small bowl, mix the egg, ricotta cheese (I didn't use the whole container.), 3/4 cup Parmesan cheese, garlic, and basil
    • Note: I usually make a 4 layer lasagna with 12 noodles, but for some reason, the box I bought came with 10 1/2 noodles, so I just made a 3-layer lasagna this time. This recipe will explain the 3-layer version.
  5. In a 13x9 pan, pour a little bit of the white sauce mixture to coat the bottom of the pan. Place 3 noodles on the bottom. Spread half of the ricotta mixture onto the 3 noodles.
  6. Slice the zucchini into thin slices. Place one layer of zucchini in the pan. Sprinkle some mozzarella cheese over the zucchini. Top with a small layer of the sauce.
    • Note: Be careful not to use too much sauce. You want to make sure you have plenty of sauce for the top layer! If you think you won't have enough sauce consider thinning the sauce with a little bit of water.
  7. Make another noodle-ricotta mixture-zucchini(use the rest)-mozzarella cheese-white sauce layer.
  8. Place the last three noodles on top and cover with the last of the white sauce. Top with 1/4 pound of the mixed Italian cheese mixture (you can substitute this with mozzarella if you prefer) and 1/4 cup of Parmesan cheese.
  9. Cover with aluminum foil and bake at 375 for 1 hour. Remove foil and bake another 15 minutes or until the cheese on top is slightly golden.
  10. Enjoy!
Side note:
  • I recommend trying more vegetables: broccoli, bell peppers, artichoke hearts, whatever sounds good to you.

Monday, August 24, 2009

Poor Girl's Pizza

Since I'd procrastinated my grocery shopping as usual, on Sunday afternoon I opened the fridge to find nothing but a lonely tomato and a chunk of old feta cheese. What's a girl to do? Make pizza! There's always flour in my cupboard, usually a packet of yeast too, and some olive oil, and that's all you really need to make a good crust. Top your pizza with any old thing you have in the fridge (well, maybe not anything) and you've got an easy, cheap meal. My pizza recipe:

Combine 2 teaspoons dry yeast, 1 teaspoon sugar, 1/2 teaspoon salt, 1 tablespoon olive oil and 1/2 cup water in a bowl and set it aside for about ten minutes. Then, when it looks all bubbly, mix in 1 1/2 cups all-purpose flour, forming a ball of dough. Turn it onto a floured surface and knead it for about five minutes, until it is smooth and elastic. Coat it with a little oil or cooking spray and put it back in the bowl, covered, to rise until doubled in size (about a half hour).

When the dough has risen, stretch it out nice and round and flat onto a pizza pan coated with a small handful of cornmeal. Rub some olive oil all over it, then add your toppings. I used dried basil flakes (fresh basil would have been even better), tomato slices, and crumbled feta cheese. Salt and pepper it too, if desired. I like to salt the crust nice and good for sure.

Bake it for about 15 minutes in a 450 degree oven, or until the crust and the edges of the topping look toasty brown. Depends on how crunchy you like your pizza to be. Anyway, right when you take it out of the oven, rub butter onto the crust. Then slice it up and enjoy!

Friday, August 21, 2009

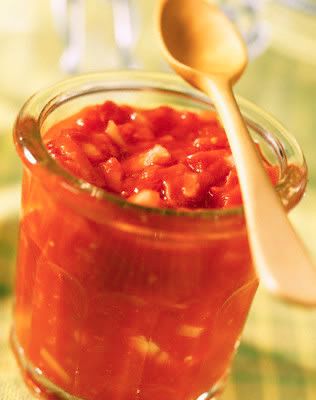
Mama's Sweet Salsa


When I went home to Illinois, I helped Mama cut up some of her garden vegetables and together we watched the pot of salsa boil down. Mama spared 2 of her fresh jars and gave them to us. On Monday, I took the jar of salsa into work. My coworkers couldn't get enough of it and suggested even that Mama sell the product in stores. I won't charge you for it- but know that it is darn good- I even had to gaurd the office fridge.

Mama's Sweet Salsa (Makes about 8-9 pints)
19-20 tomatoes (Medium sized)
10 Chili Peppers/Green Preppers 3 Jalepeno Peppers
2 c onions or 2 large onions
1/2 c cilantro
1/2 c vinegar (apple or white, apple makes it sweeter)
5 cloves of garlic
1/2-1 c sugar (you can put more in if your peppers aren't that sweet)
salt & pepper to taste
add 2-3 stocks of celery if you like some crunch

chop all ingredients, vary sizes: if you like it chunky go for it- some people peel the tomatoes- mama leaves the skin on.

boil the mixture down till liquid is gone (about 1- 1.5 hours on medium heat, continue stirring)

pour into jars while hot, boil lids for 1 minute then place lids & rings on jars. place jars into water bath with 1"-1.5" of water above the jars. Boil the water 20-35 minutes (depending upon size of jars) Remove jars from water bath, let jars cool. (they should seal up at this point)

enjoy with fresh chips, in a breakfast burrito with some ranchero cheese, or best sprinkle on grilled fish.

Wednesday, August 12, 2009

Around the Web in Foodie Posts for the past couple of weeks

Sorry I have been on Hiatus, y'all. Travelling puts a crimp in my writing schedule. Luckily, a bunch of bloggers have been filling in the summer blanks:
Do you have posts that you have especially enjoyed this summer?

Tuesday, August 11, 2009

Magic!!

Are you avoiding using your Crockpot because it's a pain to clean after you've been cooking the goodness for 8 plus hours??

Well... avoid no more! Crockpot clean up is a breeze now with Crockpot liners from Reynolds.

Here's some chili I cooked in the crockpot for over 10 hours.

This is what the Crockpot looked like after I took the liner out... I just had to wipe it out with a damp paper towel!!
Brilliant I tell you!! Brilliant!